Part 2 - Model Implementation & Training — Image Classification with YonoHub & Tensorflow V2.0

Researches, in the Deep Learning community, are developing state-of-the-art algorithms to tackle various problems in our daily life. Starting from simple Cat-Dog image classifier to Facebook TransCoder AI Model which translates one programming language to another.
Many challenges are facing researchers in the field. One of them is to collect the appropriate dataset for the problem settings. However, as we discussed in the previous tutorial of this series, we have a new stream of data every day. The trick is to easily reuse the dataset with different models written in different frameworks without the compatibility issue. We covered in the tutorial how we are using a single format of all the dataset, using the Tensorflow Dataset package, in a single YonoArc block to be the higher level of the training stack with which the users can interact without writing a single line of code.
Creating the architecture of the model is another challenge but it is mainly the whole point of research. Researchers are competing to reach the best performance in their area of research.
To reach such a high performance, you need a fast and easy way to create, train, and test the proposed architecture. Intuitively, we can make use of the easy drag and drop YonoArc block with 50+ datasets from the previous tutorial.
In this series of tutorials, we will go through a deep learning journey, especially for Image Classification, starting from streaming a dataset till the deployment. The tutorials cover how to use Tensorflow in Yonohub by using the blocks offered within YonoArc for a fast and easy way of development and deployment.
In this tutorial, we will implement a CNN classifier model for the CIFAR-10 dataset streamed from the Tensorflow Dataset Player implemented in the last tutorial. Then, we train the model and log the Loss as well as the Accuracy of the model to the Dashboard in YonoArc. During training, we use Netron encapsulated as a block to visualize the architecture of the implemented model. Moreover, the CPU/ GPU consumption is checked using SSH communication to the model block. Finally, we reviewed the results of the training.
Model Implementation
Imagine that the traditional training loop is split into different blocks of code that have a standard way of communication. Let’s split, as a start, the loop into a dataset player and a model. If we have a common way of sending and receiving the data between the player and the model. We can have a reusable training loop in the sense that we can replace different models on the same dataset or vice versa. This is the main point of using Yonohub for training.
Let us design the second component in the new training loop!
To have more freedom during the training loop design, we preferred using the custom training in Tensorflow.
As shown below, the cifar_cnn class represents the CIFAR CNN block object in YonoArc which you can freely purchase from here. The constructor contains the initialization of the default values for the class attributes, for example, the available classes in the CIFAR-10 dataset, the mapping of the classes to integer values, etc…
In on_start(self), we get the values of some essential parameters, from the user, using get_property function, for example, the momentum, learning rate, number of epochs, etc…
The CIFAR model is created as well in the on_start(self) by calling the create_model(self). This function constructs a sequential model of layers as shown above.
At the end of on_start(self), some necessary objects are created, for example, the optimizer as well as the loss and the accuracy objects.
After on_start(self), run(self) *function is called in parallel to the *on_new_messages *function. The *run(self) is responsible for the training loop while reading the images and labels from the self.batches queue which contains the available data batched using the on_new_messages function.
From the previous tutorial, we had a player block that publishes the image classification dataset as a single image and label. In this tutorial, we changed the player block to publish a batch of images as well as the corresponding labels. You can freely purchase the new player from YonoStore.
The training(self) function is called in the run(self) to conduct the training. The training(self) function is a custom Tensorflow implementation of the training loop, however, the data is read from the self.batches queue with a preprocessing step done by the batch_transform(self) function.
The batch_transform(self) function converts the ROS messages, which is the format of messages in YonoArc, to Tensors. During the conversion, the image batch is converted to RGB from BGR format due to the previous conversion in the player block using OpenCV. The label batch is mapped to the integer version using the self.ind2label dictionary defined in the block constructor. Before fitting the data to the model, the images are normalized.
A normal training loop is conducted by calling the train_step(self) function which conducts the forward feeding as well as the backpropagation. It calculates the loss as well as the accuracy. We save the model at the end of each epoch which will be used for visualization of the ANN architecture using Netron later. The model is saved as a .h5 file with a filename given by the user and it’s location too.
Now, let us demonstrate how to close the training loop by connecting the player to the CIFAR CNN block model described above. Moreover, we can see how we use the YonoArc interface to set all the required parameters.
Tensorflow Training in Yonohub
The training pipeline in YonoArc is easier to be understood. A block that streams the data (images, labels) with a specific frame rate you can choose. The dataset can be selected from a drop list in the block which includes 50+ image classification datasets offered by the Tensorflow Dataset package.
Another block that represents the model which are going to be trained on the selected dataset. Both blocks are connected using two ports through which both the batch of images as well as the labels are exchanged. The batch size can be set by creating a global parameter in the pipeline and both blocks can read it easily.
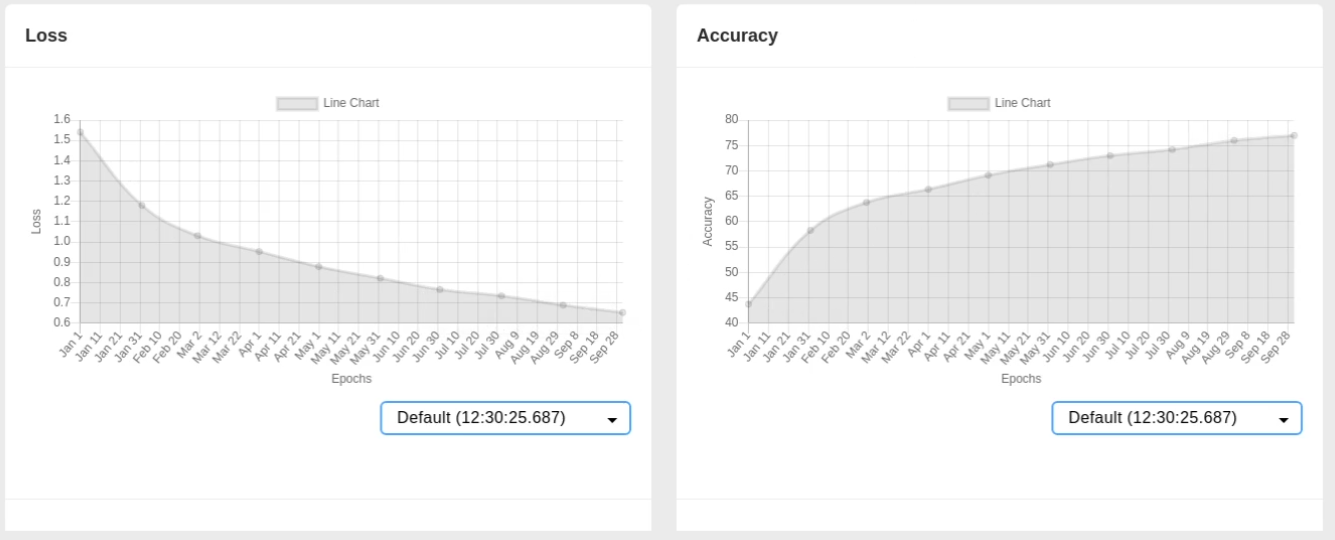
The model block publishes two values each epoch: Loss and Accuracy. Both values can be visualized using the Line Charts block which plots the data live to the dashboard.
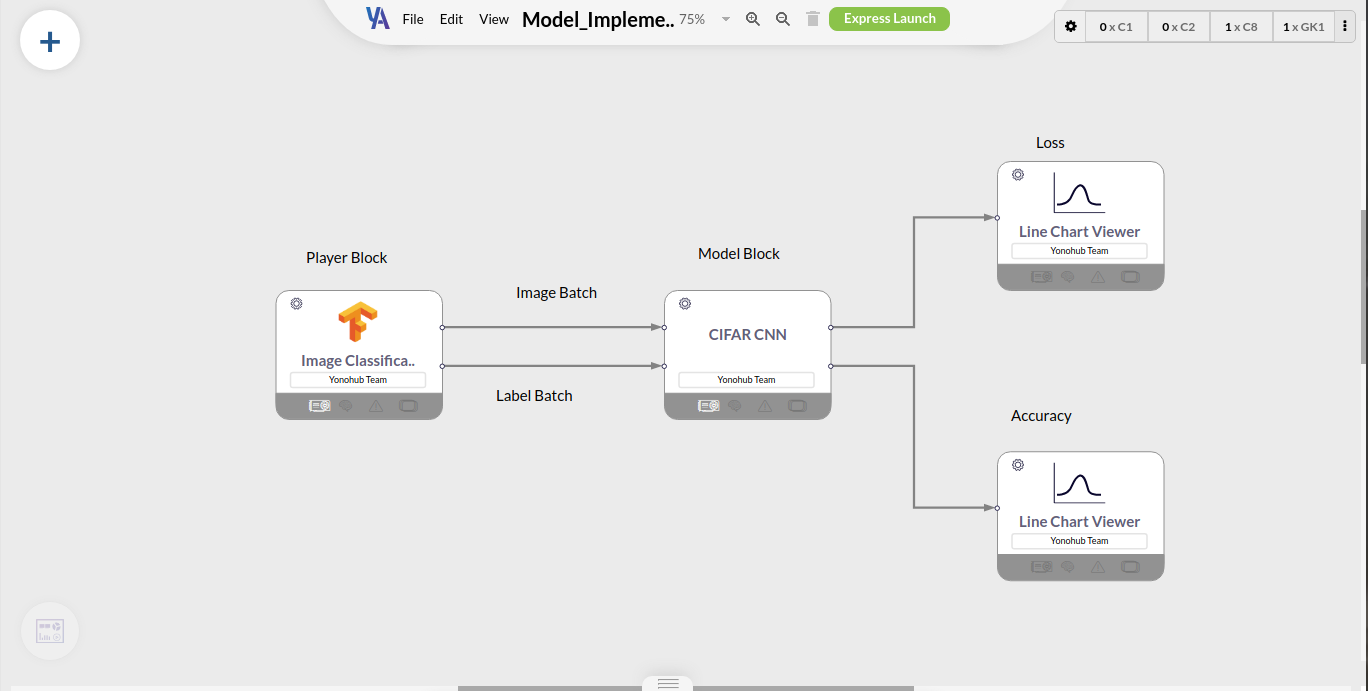
YonoArc Training Pipeline
Now, we are ready to launch our training pipeline. The player block will instantly download the CIFAR-10 dataset we select. After the downloading is complemented an alert will be sent to state so. You can click the play button which is newly added to this player block to let the user determine when to start the training. Consequently, the data starts to be streamed between the two blocks and after a while, the model block will give an alert of the current epoch. You can continuously check the dashboard for the progress of the training.
Visualize the ANN Architecture
While the training is in progress, the ANN architecture can be visualized using the Netron block. Netron is a viewer for neural networks, deep learning, and machine learning models. We encapsulate the Netron package in a YonoArc block to easily drag and drop while training.
After placing the block in the pipeline, the location of the model.h5 is required. Then, we can launch the block and wait for the running mode.
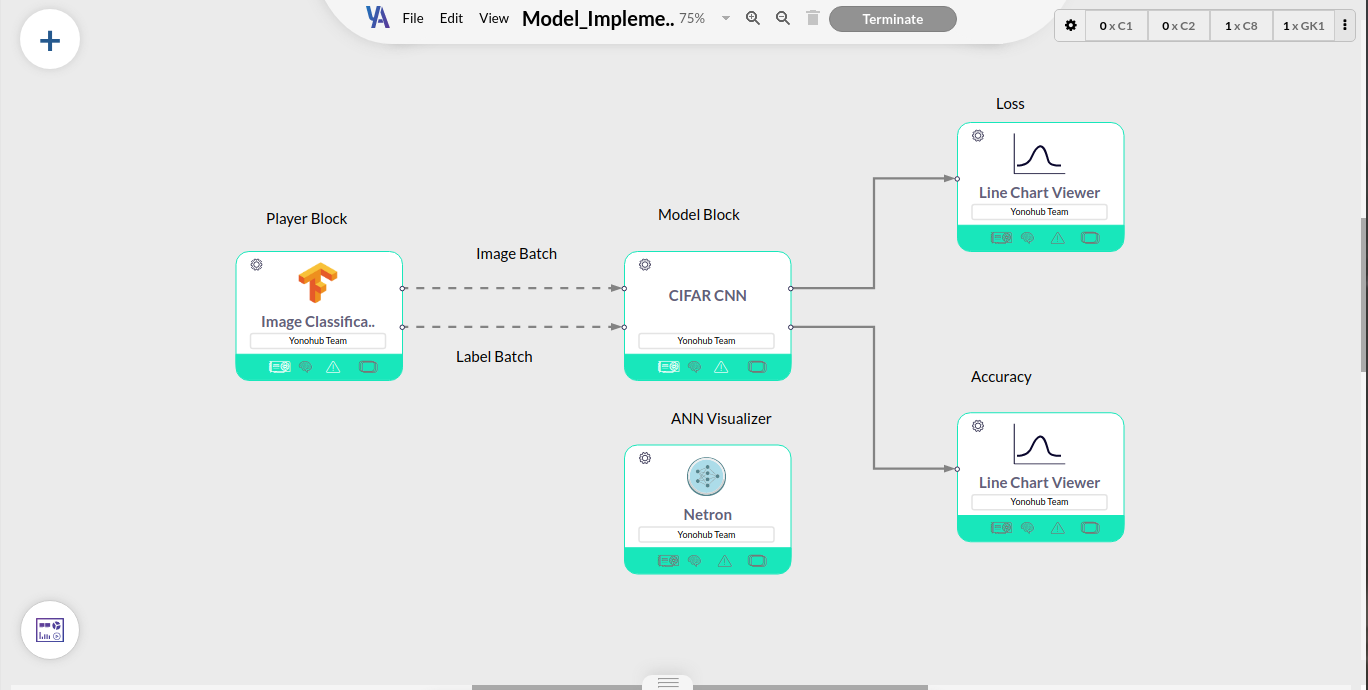
Running Training Pipeline
A clickable URL will be appeared in the block settings to be used to open Netron web-app in a new tab. The model architecture is shown in a nice and a readable way as seen below,
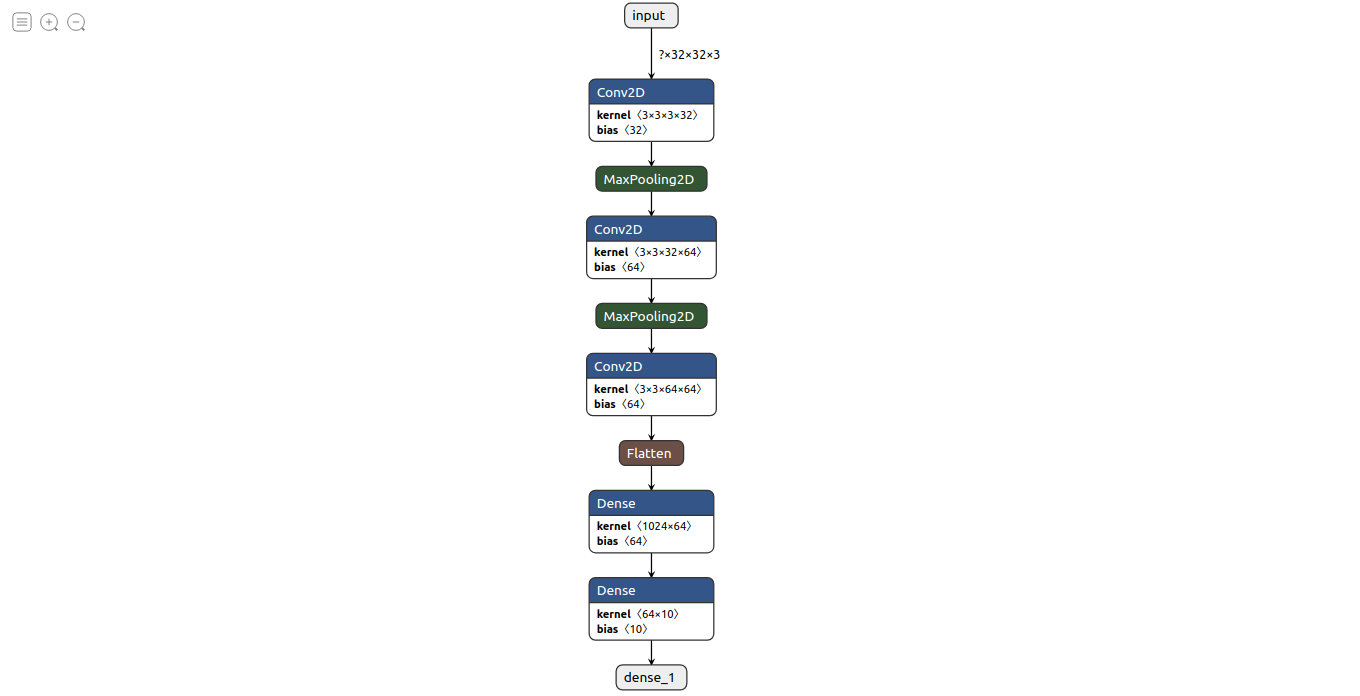
Model Architecture visualized in Netron
CPU/ GPU Consumption
Still, there is one missing part of an effective training loop. The efficiency of the developed algorithm can be continuously reviewed while the training is in progress. We added an SSH communication channel in the model block to let users have access to the machine at which the model runs.
Two properties are added to the model block to establish this channel. A username and a password for the user of the block. Yet, you can use the default values of the properties. The two entities are set before the launch of the pipeline.
From your local terminal, you can type the following command,
sudo ssh [username]@[URL] -p [port]
You need to replace the [username]by the value, you inserted in the block property. [URL] as well as [port]can be replaced by the URL: Port which has shown in the model block’s settings.
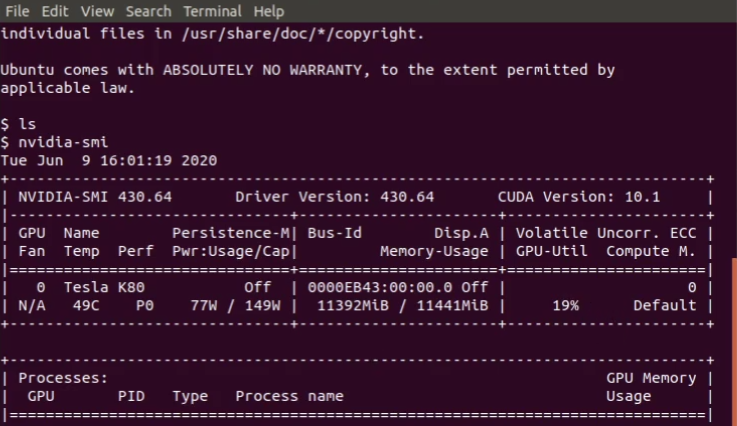
After inserting the password, you have access to the GPU machine used for training the model. You can run multiple useful commands to check the CPU as well as the GPU consumption. For the CPU consumption, you can use the top/ htop command as shown below,
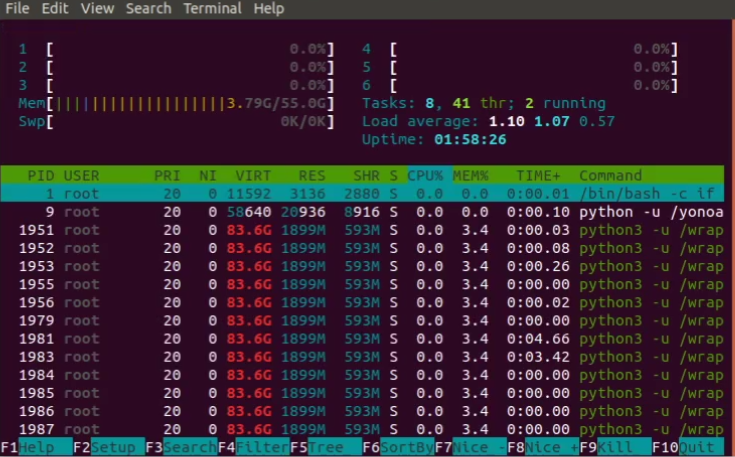
htop
In addition, you can use the nvidia-smi command to review the GPU consumption,
nvidia-smi
Check Training Results
Finally, we can check the final results of the training of our CIFAR classifier. The model block sends alerts indicating the completion of the training process as well as saving the final model. The loss and accuracy of the model, over the epochs, can be viewed from the dashboard as shown below,
Loss and Accuracy
Training in Yonohub
You can follow the next video tutorial to replicate the steps required to produce the above results. However, you can download the .arc file of the pipeline and open it in YonoArc, from here, directly without worrying about even setting the above parameters. Although, you need to freely purchase all the blocks used in the article from YonoStore.
Visualize the ANN Architecture
Conclusion
Now, you have a trained classifier on the CIFAR-10 dataset using a new way of training. YonoArc facilitates the idea of training by using the concept of divide and conquer. Separating the player and the model in two distinct blocks makes the training loop more reusable later. It facilitates the idea of inserting different utility packages like Netron while the training is in progress.
More benefits can be made from the above training setup. Many utility packages can be easily integrated. In the rest of the series, we will point out some of these benefits. We are waiting for your first experience with the new setup and your feedback.
About Yonohub
Yonohub is a web-based cloud system for development, evaluation, integration, and deployment of complex systems, including Artificial Intelligence, Autonomous Driving, and Robotics. Yonohub features a drag-and-drop tool to build complex systems, a marketplace to share and monetize blocks, a builder for custom development environments, and much more. YonoHub can be deployed on-premises and on-cloud.
Get $25 free credits when you sign up now. For researchers and labs, contact us to learn more about Yonohub sponsorship options.
If you liked this article, please consider following us on Twitter at @yonohub, email us directly, or find us on LinkedIn. I’d love to hear from you if I can help you or your team with how to use Yonohub.
